Sunday, May 31, 2009

Newfie Night Lobsterfest

So this weekend was our Newfie Night Lobsterfest. A group in Dryden put together this annual lobsterfest to support the local community. This year the money was going towards the Red Cross. One of our best friends is actually from Newfoundland so we went with them last year. We were invited again this year so drove into Dryden for another fun filled Newfie Night Lobsterfest. Tickets were only $30 and you ended up with a 1 ½ pound lobster, mussels, baked potato, 5 types of salads, buns, and dessert. There were silent auction items, ticket door prizes, an ever-flowing bar, and a dance. The music was mostly Atlantic Canada music (like Great Big Sea or the Rankins) with a touch of country and a few other older hits. The night went well for all of us. We had a huge group this year, so it was nice to socialize and dance. However, the organizers unfortunately ran into a huge situation. Apparently the consumer sent the lobsters by pound. When the organizers requested lobsters by numbers. So this discrepancy left 50-60 people without dinner..YIKES! We were lucky that our table was in line second.
Since our friends were letting us crash at their place, and they purchased the tickets for us a head of time, I thought I would put together a little thank you gift. I was thinking Newfoundland, ocean, lobster, so beach.
I took an plastic orange pail and shovel, added plastic reusable ice cubes, two plastic cups, some cute napkins, and added a bottle of rye. I also attached a bottle opener on the side of the pail that is attached with a chain. I had a vision of a beach party in my mind and was thinking the pail could be used for ice and you could scoop the ice out using the tiny shovel. Or you could place a few beer in the pail with the ice. Anyways, I thought it was cute, and I absolutely fell in love with the napkins I purchased at a local gift shop. The colours worked perfectly with the pail.
The colours were so great they matched a card that I already had on hand. The card uses SU Pick a Petal stamps to create surfboards. I also brayed and sponged the background colours to form the sky, water, and beach.
Ingredients:
Stamps: SU Pick a Petal; EZ Success Sentiment (part of one..the word "hang"); PTI Simple Alphabet (#10)
Paper: SU Whisper White; SU Tempting Turquoise; SU Only Orange; SU Chocolate Chip textured
Ink: SU Real Red; SU YoYo Yellow; SU Only Orange; SU Creamy Caramel; SU Chocolate Chip; SU Tempting Turquoise; SU Bashful Blue; SU Brilliant Blue
Accessories; Brayer; sponges; white gel pen; brad

Thursday, May 28, 2009

Say it with Flowers!

I put this little gift together for my Aunt's Birthday. Her birthday is in June and she loves to garden. In the past she has received hedgehogs as little nicknacks, and when I saw this watering can with the hedgehog I knew it would be perfect for her. Over the last year I have found other items to add to the gift. I found the little spade at a local gift shop here in town, and the stone is from the Massage and Wellness store here in town. The card uses images from MFT Can Ya Dig It? and the little notepad is decorated using SU Pick a Petal.


Card Ingredients:
Stamps: MFT Can Ya Dig It?
Paper: SU DSP Hostess set 2007; SU Pixie Pink; SU Certainly Celery; SU So Saffron; SU Whisper White
Ink: SU Real Rust; SU Garden Gree; SU Chalks YoYo Yello, Pixie Pink; Rose Red
Accessoires: SU Mellow Moss grosgrain ribbon; pop dots


This notepad is a score from Micheals. Only $1.50 CDN in the discount section. Who could go wrong with that. It origianl had the initail of my aunt on it, but I decided to cover it. I decided to emboss circles on the So Saffron paper and then repeated the dot pattern with the leaves on the flower using SU Pick a Petal. I added a scalloped edge to the green scrap paper using scalloped scissors. I then layered the saddle stich ribbon over top. The center of the flower layers two buttons I have had for ages. To help keep the buttons together I tied using hemp and attached using a pop dot.

Notepad Ingredients:
Stamps: SU Pick a Petal; PTI Mega Mixed Messages; SU Simple Shapes
Paper: SU So Saffron; SU Whisper White; scrap green
Ink: SU Pretty In Pink; SU Certainly Celery
Accessories: PTI Lemon Tart Saddle Stich Ribbon; versamark; clear embossing powder; embossing gun; corner rounder; scalloped scissors; redline tape; buttons; hemp

Bargain Baby Box

When I was at Micheals last weekend I absolutely fell in love with this paper by Imaginisce called "Hey Foxy". I just had to buy it. And when I was checking out the discount isle I found a recipe box for $1.50 CDN and the notebook with pen for $1.50 CDN. Who could go wrong......oh did I mention that the ribbon was only 25 cents???? Ya, total bargain. Thank goodness my DH wasn't in town with me. I spent a good two hours wandering the store and checking out deals and racking my brain around creations I could make. So I decided to make a baby box where the new mom can put photos before scrapin' them. The little book is so she can make notes about each photo to then use as journalin' later.


The sentiment comes from PTI's Mega Mixed Messages, and the ink colour is SU Groovy Guava. It matched perfectly to the paper and ribbon. I am quite pleased with this. Simple, easy, and cheap. :)

Bargain Baby Box Ingredients:
Stamps: PTI Mega Mixed Messages
Paper: Imaginisce Twitterpated "Hey Foxy"; Imaginisce Twitterpated "Mushroom Fancy" (backside dots)
Ink: SU Groovy Guava
Accessories: Buttons; Hemp; Redline Tape; Square punches; ribbon; recipe box; notepad

Monday, May 25, 2009

Summer Berry Board Album

Here is a board book that I took, decorated with some summery paper, and turned into a mini summer album....now I just need some pictures to add to the book. Because the book is now thicker due to all the paper I took this candy stripped ribbon to use as a closure.
Pages One & Two- Lemon, limes, and oranges.
Ingredients:
Stamps: SU Tart & Tangy
Paper: SU Bashful Blue, SU Certainly Celery, SU Only Orange, SU YoYo Yellow, SU DSP Summer Picnic
Ink: SU YoYo Yellow, SU Certainly Celery, SU Only Orange
Accessories: Grosgrain Ribbon
Page Three & Four: Flowers for all Season
Ingredients:
Stamps: None
Paper: SU Always Artichoke, SU Bashful Blue; SU Not Quite Navy; SU DSP Summer Picnic
Ink: None
Accessories: Blue Grosgrain Ribbon; SU Bashful Blue Taffeta Ribbon; flower brads; SU Circle Ice Brads; Flowers

Pages Five & Six: An Apple a Day
Ingredients:
Stamps: SU Tart and Tangy
Paper: SU Real Red; SU Always Artichoke; SU DSP Summer Picnic
Ink: SU Real Red; SU Always Artichoke
Accessories: None

Pages Seven & Eight: Bright Dots
Ingredients:
Stamps: None
Paper: SU Not Quite Navy; SU Only Orange; SU DSP Summer Picnic
Ink: None
Accessories: None

Pages Nine & Ten: Berries
Stamps: SU Tart and Tangy
Paper: SU Real Red; SU Gable Green; SU DSP Summer Picnic
Ink: SU Real Red
Accessories: SU Circle Ice Brads; Photo corner tags


The only DSP that didn't come from SU is the Popsicle paper here on this page. I thought it matched my summer theme and the colours quite well.

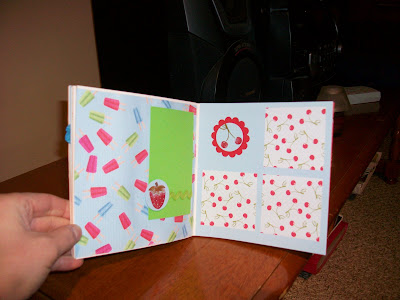
Pages Eleven & Twelve: Cherry Popsicles
Ingredients:
Stamps: SU Tart and Tangy
Paper: SU Bashful Blue; SU Real Red; SU Green Galore; SU DSP Summer Picnic; Popsicle DSP
Ink: SU Real Red; SU Certainly Celery
Accessories: Rickrack green ribbon; Circle punch; Scalloped punch

Here is a box I created to hold a few cards I made to match the Album. All cards were made from scraps left over from making the album.


Thursday, May 21, 2009

Sneak Peak of Christmas

The snow is finally gone, at last warm weather, so why the heck am I posting a Christmas card. Well you see I am constantly made fun of by family and friends because I happen to have my Christmas cards ready like a year in advance. Yes they are all done, and were last year. Now the reason behind this is, we don't often travel at Christmas to visit family, so it is just the two of us over the holidays and my DH only gets Christmas and Boxing Day off. He is back at work throughout the rest of the holidays. Since I am at home off from school I don't have much to do. And since I am in the Christmas mood I always start my christmas cards. As so happens I finished ALL my Christmas cards for 2009 back in December of 2008. I've made a selection of tag cards, each with various messages and colour combinations (I used 4 different colour combinations). This card happens to say Merry Christmas in Ukrainian which will go to my aunt out in Western Canada. I also made cards saying Merry Christmas (yes a tag for each letter), Joyeux Noel; and Let it Snow. The cards were quick and easy to put together because I won a package of Christmas paper that had coordinating tags, letters, and other cute embellishments. All I did was match cardstock with the DSP selections. I am only posting this card for now, as I don't want my family to see their card. So you will have to wait till December to see the rest.


Each piece of DSP has been outlined using a gold marker. Other than the cardstock and ribbon the paper, letters, tags, and other embellishments (ordaments) came from the DSP package. I punched the top of each tag and added a eyelet to tie ribbon through. Once all the elements were cut it was simple to put together. Probably why I was able to make all my cards in a week.

Stationary Box

I've made numerous stationary boxes before but never took pictures on my digital camera. I still happen to have this one, haven't given it to anyone yet, so decided to photograph it. To make this box I found directions on someones splitcoaststampers page. However I have since found a tutorial by Dannie that is wonderful.


The paper is a sparkly embossed thick cardstock that came in a package from Zellers. I matched the colours from the cardstock with SU's colours Tempting Turquoise, Pixie Pink, Lovely Lilac and So Saffron. Since the DSP is only one sided I used SU's Simple Shapes and Little Pieces to continue the pattern on the inside of the box. Ink colours are Tempting Turquoise, Pixie Pink, Lovely Lilac, and So Saffron.


The inside of the box has a small notebook with linked paper, and a pocket to place stamps in.


I included tags and small 3x3 cards; however over the last year I have taken 2 of the 3x3 cards to use for other reasons. Normally there is room for four 3x3 cards in the right hand pocket.


The cards use the coordinating paper and inks. Sentiments are from an EK Success wheel; and dotted ribbon is from a Micheal's set, the blue grosgrain is from BoBunny.


Ingredients:
Stamps: SU Little Pieces; SU Simple Shapes; Thinking of You EZ Success Sentiment wheel
Paper: DSP from Zellers; SU Tempting Turquoise; SU So Saffron; SU Pixie Pink; SU Lovely Lilac Ink: SU Tempting Turquoise; SU So Saffron; SU Pixie Pink; SU Lovely Lilac
Accessories: Brads; lined paper; ribbon; circle punches

Tuesday, May 19, 2009

Asian Inspired

When I was last at Micheal's I saw this gorgeous DSP that I just had to get. Why??? It was just so pretty I couldn't leave without getting a few pieces. It was like it was just calling my name. I kept going back to it on the shelf, so since I have no will power when it comes to buying supplies it ended up in my cart. Now for the last month the paper has been sitting on my desk beside some brown and pink cardstock. That is about as far as I got. I was struggling with what I wanted to create. I really wanted to create an Asian Inspired piece, but am not too sure that is what this really is. After playing around with things this is what I ended up with.

During this same trip into town we stopped at Dollarama Plus. I was looking for some cute containers that would work as small gift baskets. Here I am standing in Dollarama, with an impatient DH. In my hands I have two packages of mini take-out boxes. One package is all white, the other has blue, pink, and white. Now my DH wants to know what is taking so long, and I inform him I am not sure which package I want. He then looks at me like I am crazy and says "They are only a dollar...just buy both." Ah the wisdom of a DH!! Yet when I am at Micheal's I have no willpower and basically the entire store ends up in my cart, but when I am at Dollarama my conscious appears and questions the money I am spending. Needless to say that day I walked out of Dollarama with two packages of mini take-out boxes. To match the card I put in a strip of the paper and added some coordinating ribbon on the handle. The mini take-out box actually will hold a fair number of chocolates or toffee candies.

After making my card the pink flowers were hard to see and I felt like the blue highlight in the DSP was missing from my panel, so I went back and added some turquoise buttons. I wish I had all the same sized buttons, but sadly my button collection is lacking, and I had only two of each size.

Asian Ingredients:
Stamps: SU Botanical Blooms
Paper: PTI Dark Chocolate; PTI Sweet Blush; DSP Micheal's (sorry forget company)
Ink: SU Chocolate Chip; SU Pretty In Pink
Accessories: Ribbon; buttons; Martha Stewart Punch; mini take-out box

Monday, May 18, 2009

Raspberry Suite Colour Challenge Week 6

Another Rasberry Suite Colour Challenge from Dawn McVey.

This card would have turned out better had I cut the top note die first, then stamped the flourish, then embossed; however the top note die was blog candy and came embossed. I don't actually own the die. It actually doesn't look that bad in person. The missing elements distress the card.

Hi There Ingredients:
Stamps: PTI Mega Mixed Messages; SU Baroque Motifs
Paper: PTI Berry Sorbet; PTI Aqua Mist; PTI Dark Chocolate; SU Whisper White
Ink: SU Chocolate Chip; SU Sage Shadow; SU Cameo Coral
Accessories; Top Note die already embossed; buttons

This second card uses SU's Simple Shapes to create my own DP. The buckle on the ribbon is made from a beer can tab.

I took the beer can tab, added Versamark, then SU Cameo Coral ink; then clear embossing powder and heat set. I did this three times to ensure full coverage. I used tweesers for better handling.

Beer Buckle Ingredients:
Stamps: SU Simple Shapes; PTI Mega Mixed Messages
Paper: PTI Berry Sorbet; PTI Aqua Mist; PTI Dark Chocolate; SU Whisper White
Ink: SU Chocolate Chip; SU Sage Shadow; SU Cameo Coral
Accessories; Beer tab; ribbon; versamark; clear embossing powder; embossing heat gun; Marvy Tag punches (Pureple & Pink)


Birthday Card Organizer

So I have been playing around with another one of Lauren Meader's My Timeless Templates. This time around it is her All Boxed Up template. I had planned on making 8 cards, following the circle design on the front, and adding corresponding envelopes. However, I was a little disappointed to discover that none of my envelopes fit inside the holders. So I had to decide what to do instead. I decided to still include the four cards I had already made on the left hand side, and then I decided to make a Birthday organizer to go on the right hand side.


I printed off a calender for each month that has room to write down birthdays and anniversaries beside each number. I then cut and mounted onto Basic Grey cardstock to match the All Boxed Up template. I then hole punched the tops of each calendar and hooked them together with binder rings. Now, whoever uses this can flip month by month to be reminded them who's birthday or anniversary it coming up. No more reasons for forgetting.


I included four cards that can be used for birthdays, but you could also use the left hand side as a place to keep preprinted address labels and stamps. That way you have everything where you need it come time to send out the cards.
Ingredients:
Stamps: PTI's Mega Mixed Messages;
Paper: SU Basic Grey; PTI Raspberry Fizz; SU Whisper White; DSP BoBunny 'Sweet Summer Sayins'; DSP BoBunny 'Sweet Summer Plaid'; DSP DoodleBug Desgin Inc 'Lovely Lime Grid'; DSP Flair Design Inc 'A Lotta Colada'
Ink: SU Pink Passion; SU Bashful Blue; SU Certainly Celery; SU Only Orange; SU Basic Grey
Accessories: Ribbon; SU 1 3/8" and 1 1/4" Circle punches; Binder Clips